craigrussell
Technical blog from Craig Russell.
This article explains how to manage multiple SSH keys for different GitHub.com accounts so that you can access multiple accounts and projects, each with different credentials.

These instructions focus on Mac OSX and GitHub.com specifically; be warned if you are using another OS or a different hosted git repository.
If all goes well, you’ll likely be up and running within 30 minutes if you follow this guide.
Who Has Multiple SSH Keys?
A freelancer with multiple clients is likely to face this problem if several clients each run their own GitHub.com projects and only want users to use a company-issued email address registered. As such, your existing GitHub user couldn’t simply be added to their projects and you need to register for a new GitHub account to access each.
What’s the Problem with Multiple SSH Keys?
If you have multiple GitHub.com accounts it can make it harder to organise your SSH keys such that you are pushing and pulling with the right credentials to the right repositories.
When you attempt to pull or push code to a repo, the system will attempt to pick an SSH key to use and it won’t always match up. Often, it will just try the first key and for some projects you’ll see authentication problems as it is trying to connect with the wrong user.
The Solution
- Create SSH keys for each GitHub.com account
- Register the correct SSH keys with the correct GitHub.com account
- Create a git config file
The first two steps are the standard process; create an SSH key locally on your machine and then copy the public key information into your GitHub.com account settings.
The ✨magic ✨ happens when you create the git config file in step 3.
Backup Existing Keys
Back up your existing SSH keys. Even if you think you’ll be fine. Even if you think it’s OK if you were to lose them. Even if you think you don’t have any yet. Just make a backup of your ~/.ssh just in case. Bad things happen sometimes.
Creating SSH Keys
If you already have multiple SSH keys, you probably won’t need to make new ones. However, you might need to register them with ssh-agent if you haven’t done so already. If you are having problems, creating a new SSH key is quick and easy to do.
Viewing Existing Keys
You can view all of the existing SSH keys at ~/.ssh/
If you’ve followed SSH key creation steps before, you’ll likely have a file called id_rsa and another called id_rsa.pub; these are your private and public keys, respectively.
If you already have all of the SSH keys you want, you can skip the creation steps. Otherwise, read on for instructions for creating one or more new keys.
Creating a New SSH Key
You create a new key by running the following command, substituting for your own email address:
ssh-keygen -t rsa -b 4096 -C “_your_email@example.com”
You’ll be prompted to “_Enter file in which to save the key”. You should use the standard id_rsa prefix followed by a descriptive name for your key.
So let’s assume you need to make accounts for a personal SSH key and a work one.
- Call the first key id_rsa_personal
- Repeat the process again to create id_rsa_work
⚠️ Note that the prompt expects you to enter the path to the file as well; failing to add this will create the file in the current terminal directory which may not be what you want.
The final step is to secure the keys with a passphrase. Do so.
Registering your new SSH Keys
New keys need registered before they are useful. To register, we need to use ssh-agent and to use that, we need to first make sure it is running:
eval "$(ssh-agent -s)"
Once running, you can then add your new keys. Repeat the following command for all new keys you have added, substituting the correct path to the private key. For example:
ssh-add ~/.ssh/**_id_rsa_personal_**
Add your SSH Keys to GitHub.com
You can follow the GitHub Documentation in case this process changes on their website. Currently, you want to copy your public key and paste it into the relevant section on your GitHub settings.
To copy the public key to the clipboard, run the following, substituting for the correct filename:
pbcopy < ~/.ssh/**id_rsa_personal.pub**
⚠️ Note, you want to be really careful that you match up the correct key with the correct GitHub account otherwise you are in for a world of confusion. You see now why I recommend descriptive names for them?
When signed in to GitHub.com (with the right account!) click on your avatar and choose settings. Choose SSH and GPG Keys from the menu, and click the New SSH Key button.
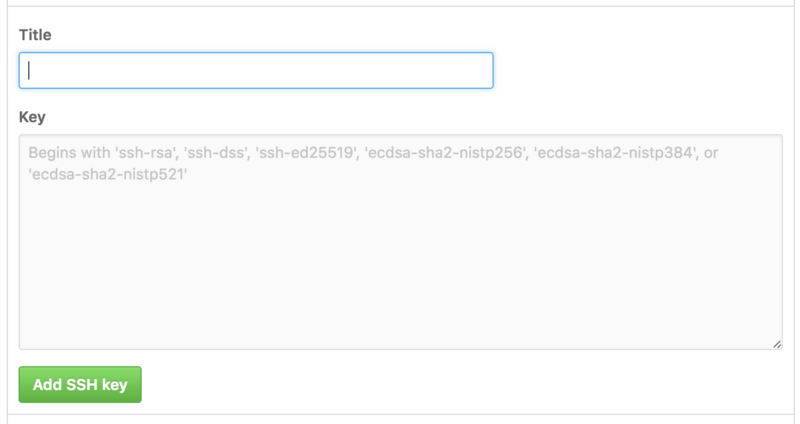
Registering an SSH Key on GitHub.com
Give it a descriptive title and then paste the contents of your clipboard (containing your public key information).
Once done, you’d want to login to your other GitHub.com account and register the other public key. Repeat this for as many different accounts as you are managing.
Create a Git Config File
A config file is used to tell git which SSH key is to be used with which URLs.
A git config file lives at ~/.ssh/config. If the config file doesn’t yet exist, go ahead and create it:
touch ~/.ssh/config
Here is an example from my ~/.ssh/config file
Host me.github.com
HostName github.com
PreferredAuthentications publickey
IdentityFile ~/.ssh/id_rsa_personal

Host github.com
HostName github.com
PreferredAuthentications publickey
IdentityFile ~/.ssh/id_rsa
Note that, although subtle, the first and fourth lines differ for each entry. By defining each account with a different Host value, you can specify which git URLs use which SSH key.
Above, I specify that:
- any git URL that uses me.github.com should use id_rsa_personal
- any git URL that uses github.com should use my id_rsa key.
I have an SSH key for personal projects, and another key for everything else. You might need to add more than two entries into your config if you have additional accounts to manage.
Cloning Projects
After following the steps above, there is only one thing left to do: clone a project.
When cloning a project from GitHub using SSH, the URL format is
git@github.com:USERNAME/PROJECT.git
You can replace github.com with your custom specified Host from your config, depending on which account you are wanting to use.
For example, let’s look at this project from GitHub.
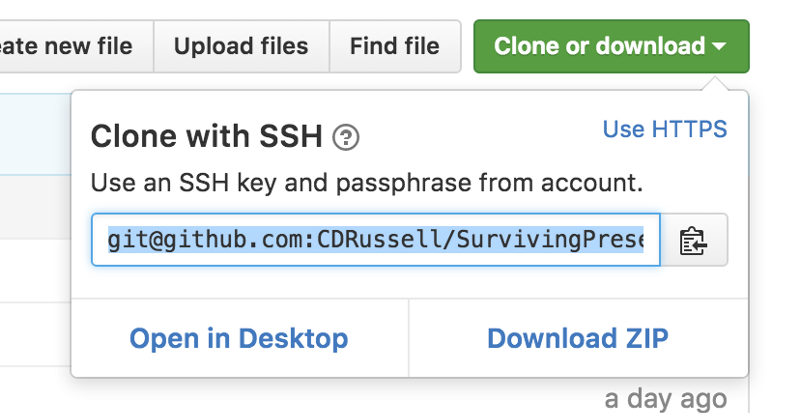
GitHub tells us that we should use this URL:
git@github.com:CDRussell/SurvivingPresenters.git
To use our personal SSH key, we remember our setting from the ~/.ssh/config file:
Host **me.github.com**
HostName github.com
PreferredAuthentications publickey
IdentityFile ~/.ssh/id_rsa_personal
which tells us to use me.github.com instead of github.com. Therefore, we can use that URL instead to clone the project using the personal SSH key. For example:
// uses standard SSH key
git clone git@github.com:CDRussell/SurvivingPresenters.git

// uses personal SSH key
git clone git@me.github.com:CDRussell/SurvivingPresenters.git
Conclusion
If you followed along you hopefully now have everything you need to painlessly manage multiple projects hosted across different GitHub accounts.
It is undoubtedly a little tricky to setup but now that you’ve done it, you won’t have to think too much about it again; just remember to clone the url with the correct git@XXX.github.com format depending on which account you want to use.
Attributions
- Padlock image: Unsplash